A detailed guide to identifying and eliminating hum or buzz in audio systems caused by ground loops. Learn how to verify grounding connections, use ground lift switches, isolate audio signals, and apply technical solutions such as ferrite beads and proper cabling practices to remove interference - ensuring clean and stable sound performance.
Step 1: Identify the signs of a ground loop
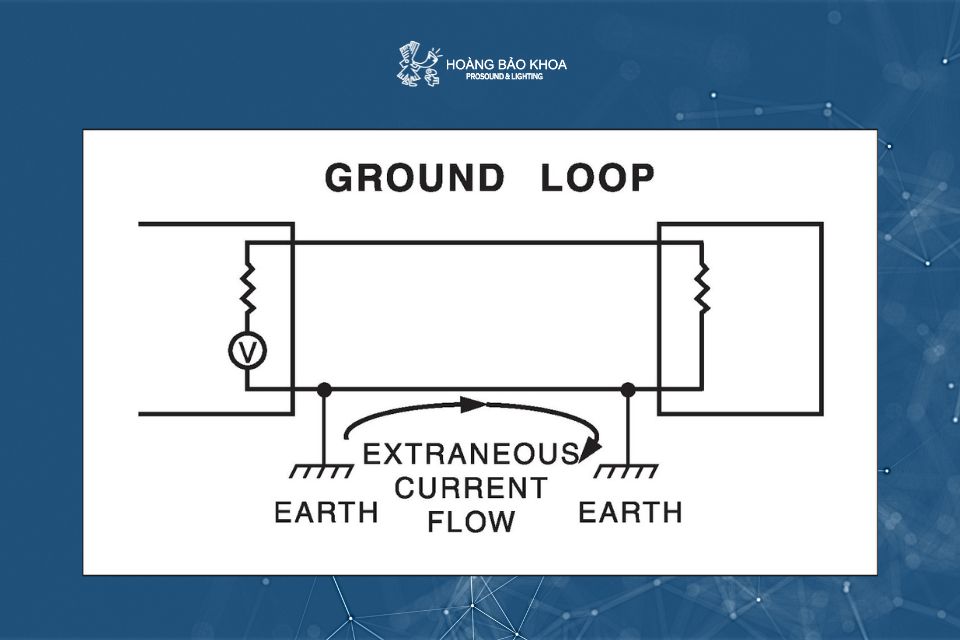
A ground loop is a common cause of unwanted hum or buzz in audio systems, especially those with multiple interconnected devices. Before attempting to fix the issue, confirm that the problem is indeed caused by a ground loop. Common indicators include:
- Low-frequency hum (typically around 50 Hz or 60 Hz).
- Buzzing sound that changes when devices are connected or disconnected.
- Noise appears only when a specific device is connected, not constantly present.
Step 2: Check the electrical grounding
- Use a common power source: Ensure all audio devices are plugged into the same outlet or power circuit that shares the same grounding point. Using multiple circuits can cause ground potential differences.
- Verify proper grounding: Inspect the power cables and outlets to ensure they are correctly grounded. A faulty or missing ground connection can introduce noise into the system.
- Avoid daisy-chaining multiple power strips: Limit the use of chained extension cords or overlapping power splitters, as these can create multiple ground paths and increase the risk of ground loops.
Step 3: Use the “ground lift” switch (if available)
Many Professional Audio devices such as DI boxes, active speakers, or mixers include a “ground lift” switch. This switch disconnects pin 1 (signal ground) of the XLR connector from the device chassis, isolating signal ground from equipment ground. Note: Activate the ground lift on only one end of the connection to avoid creating a “floating ground,” which can cause safety issues or increase noise.
Step 4: Manually isolate to locate the ground loop
If the ground lift switch does not resolve the problem, try the following STEPS:
- Disconnect all XLR inputs from speakers or amplifiers.
- Check the sound again - if the hum or buzz disappears, you are likely dealing with a ground loop.
- Reconnect each device one by one, monitoring when the noise reappears.
- Note which device or cable introduces the noise - this is likely the source of the ground loop.
Step 5: Use a ground loop isolator
Once the problematic signal path is identified, insert an isolation transformer or ground loop isolator in that connection. These devices break the ground connection in the signal path while maintaining accurate audio transmission. Choose an isolator that matches balanced audio connections (XLR or TRS) to minimize signal loss.
Step 6: Apply additional preventive measures
- Use well-shielded cables: Prefer high-quality XLR or TRS cables to reduce RF or hum interference.
- Install ferrite beads: Place ferrite rings near the connectors of power or signal cables to suppress high-frequency noise.
- Maintain proper cable spacing: Avoid running power and signal cables parallel or too close together to prevent electromagnetic induction.
- Keep cables organized: Do not coil excess cable length or let them overlap — this can turn them into antennas for interference.
Step 7: Use supporting tools and techniques
- DI Box: Use an active or passive DI box with a ground lift feature to isolate unbalanced signals.
- Balanced connections: Prefer XLR or TRS connectors instead of RCA or TS for better noise rejection.
- Power conditioner: In complex setups, a power conditioner helps stabilize voltage and significantly reduce background noise.
Expert recommendations
- Document your system’s wiring and power layout to identify potential ground loop sources easily.
- Test each part of the system separately before full integration to pinpoint noise sources.
- Consult the manufacturer’s technical documentation, as some devices have specific grounding recommendations.
Conclusion

A ground loop is a common cause of hum or buzz in audio systems. When facing such issues, follow these steps: verify grounding, use ground lift, manually isolate connections, and insert an isolator if necessary. By properly setting up your power and signal systems, you can eliminate unwanted noise and achieve clear, stable sound performance for professional audio setups.